Womens Fitness
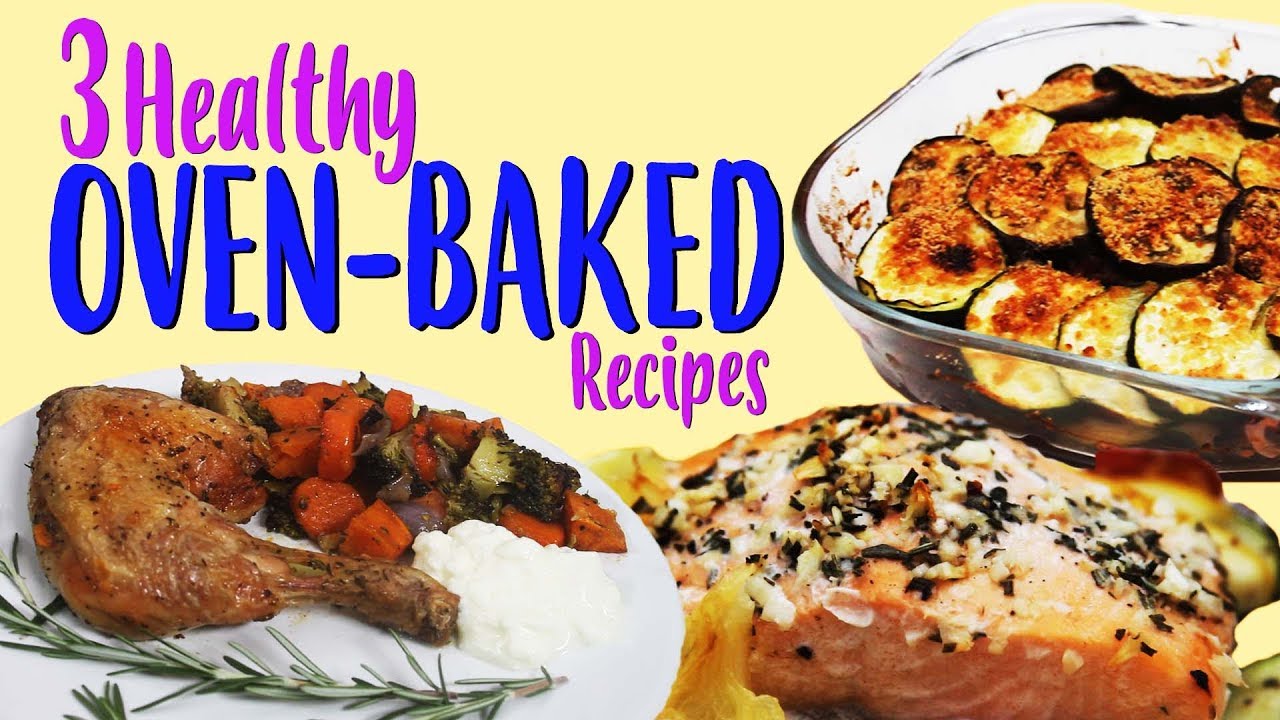
3 Healthy Oven-Baked Dinner Recipes | Joanna Soh

SUBSCRIBE for new videos every week: https://www.youtube.com/user/joannasohofficial Oven-baked recipes are a life-saver for those who are busy. All you need is to do a little bit of prep work, pop it all in the oven, and you can get on with doing what you need to, while a nutritious meal is cooking for your family.
It’s a healthy and wholesome meal all in one tray. The formula is really simple. Combine Protein + Vegetables + Oil + Seasoning and you have your dinner! Watch this video!
SNAP & SHARE your pictures. Tag me @JoannaSohOfficial #JSohRecipes
READ below for the recipes and steps.
________________
Joanna is a certified Personal Trainer (ACE), Women’s Fitness Specialist (NASM) and Nutrition Coach, with over 8 years of experience.
Stay connected and follow me:
Joanna Soh:
http://joannasoh.com/
https://www.instagram.com/joannasohofficial/
https://www.facebook.com/joannasohofficial/
https://www.youtube.com/user/joannasohofficial
Tweets by Joanna_Soh
(Subscribe to my website for printable workouts & recipes)
https://www.instagram.com/hernetwork.tv/ https://www.facebook.com/hernetwork.tv/
________________
ROASTED CHICKEN W MIXED VEGETABLES (serves 2)
1. 2 Chicken Legs Quarter – 336Cals each
2. 2 Carrots, sliced – 50Cals
3. 1 head Broccoli – 98Cals
4. 1 Sweet Potato, sliced into cubes – 112Cals
5. 1 Red Onion, sliced – 46Cals
6. 6 Garlic Cloves, crushed – 27Cals
7. 1 tbsp. Olive Oil – 69Cals
8. 1 tbsp. Apple Cider Vinegar – 3Cals
9. ¼ tsp. Fresh Rosemary, chopped
10. ¼ tsp. Mixed herbs
11. Salt & Pepper to taste
Steps:
1. Pre-heat oven to 425°F/220°C.
2. Rub the chicken legs with olive oil. Season with fresh rosemary, salt and pepper. Set aside.
3. Next, make a bed for the chicken pieces by arranging the vegetables on the bottom of a baking dish. Season the vegetables with a little bit of olive oil, apple cider vinegar, salt, pepper, mixed herbs and some rosemary.
4. Transfer and arrange the chicken legs on top of the vegetables.
5. Bake for an hour or until chicken is cooked through.
6. Serve warm!
Per serving: 540Cals
BAKED SALMON & ZUCCHINI (serves 1)
1. 1 Salmon Fillet – 416Cals
2. ½ Zucchini, halved lengthwise and thinly sliced – 9Cals
3. ½ cup Cherry Tomatoes, halved – 13Cals
4. ½ Lemon, slices, plus 2 teaspoons fresh lemon juice – 8Cals
5. 1 Garlic Cloves, minced – 4.5Cals
6. ¼ tsp. Rosemary, chopped
7. ¼ tbsp. Olive Oil – 17.5Cals
8. Salt & pepper to taste
Steps:
1. Preheat oven to 350°F/180°C.
2. Let’s prep the salmon. Marinade the salmon fillet with olive oil, salt & pepper, chopped rosemary and garlic clove. Gently massage the seasoning into the salmon and set aside.
3. Next, line a baking tray with tin foil. Then make a bed for the salmon fillet by arranging all the vegetables on the bottom of a baking dish and season with salt and pepper.
4. Place the salmon and drizzle with freshly squeezed lemon juice. 5. Seal it all in tightly. Place into oven and bake until cooked through for about 30 minutes.
5. Enjoy warm
Per serving: 468Cals
AUBERGINE & BLACK BEAN RATATOUILLE (serves 4)
1. 2 Aubergines, sliced – 272Cals
2. 1 Zucchini, sliced – 33Cals
3. 1 tbsp. olive oil – 69Cals
4. 1 can Diced Tomato – 108Cals
5. 1 can Black bean- 316Cals
6. 1 Onion, chopped – 46Cals
7. 2 Garlic Cloves, chopped – 9Cals
8. 25g Grated Parmesan -108Cals
9. ¼ tsp. Cayenne Pepper
10. Salt & Pepper to taste
Steps:
1. Pre-heat oven to 220°C.
2. In a large bowl, season the aubergine and zucchini slices with olive oil, and salt and pepper. Set aside.
3. To make the sauce, mix together the diced tomato, black beans, onion, garlic, cayenne pepper and salt & pepper. Set aside.
4. Now let’s assemble the dish. In a baking dish, arrange the aubergines and zucchini slices in a single layer.
5. Next, pour in a layer of the black bean sauce. Then top it up with another layer of aubergine and zucchini slices. Repeat until the baking tray is filled.
6. Finally, sprinkle with some grated cheese. Bake in the oven for 30 – 40 minutes until the top layer is golden brown. Serve hot.
Per serving: 241Cals
source
Womens Fitness
Daily Detox Drinks – Debloat, Cleanse, Weight Loss | Joanna Soh | HER Network

♥ Are you always bloated, constipated, low in energy and can’t stop eating bad foods? Your body maybe TOXIC OVERLOAD!
♥ Here are 4 SUMMER DETOX WATER to help reduce bloating, burn fat, curb cravings and lose weight! Try them out, Snap & Share with me! Tag me @JoannaSohOfficial #JSohRecipes
♥ LIKE, SHARE this video & SUBSCRIBE http://www.youtube.com/joannasohofficial Support me in reaching 1 million subscribers!!! xx
♥ Joanna is a certified Personal Trainer (ACE), Women’s Fitness Specialist (NASM) and Nutrition Coach (VN).
HER Network by Joanna Soh brings together strong and passionate, women, driven by the same vision of wanting to support other women across to be their best self.
Her Network is an extension of Joanna’s current YouTube channel: https://www.youtube.com/user/joannasohofficial SUBSCRIBE for exciting content every Monday, Wednesday and Friday.
“We aim to offer you meaningful content that will continue to add value in your life. The videos will range from health & fitness, food, parenting, life advice, beauty, fashion, lifestyle and more.”
__________
Stay Connected & Follow us!
Joanna Soh:
http://joannasoh.com/
https://www.instagram.com/joannasohofficial/
https://www.facebook.com/joannasohofficial/
https://www.youtube.com/user/joannasohofficial
Tweets by Joanna_Soh
HER Network:
https://www.hernetwork.tv
https://www.facebook.com/hernetwork.tv
https://www.instagram.com/hernetwork.tv
__________
DETOX WATER
1) Reduce Bloating
– 6 Cucumber Slices
– 6 Lemon Slices
– A few sprigs of Mint
– 1L Water
2) Fat Burner
– 1L Chilled Green Tea
– 1 tbsp. Apple Cider Vinegar
– A few sprigs of Mint
3) Curb Cravings
– 6 Apple Slices
– 2 Cinnamon Sticks
– 1L Water
4) Ease Digestion
– 3 Ginger Slices
– 6 Lemon Slices
– 6 Cucumber Slices
– A few sprigs of Mint
– Pinch of Himalayan salt
– 1L Water
These drinks will promote a more active metabolism and help burn fat more easily. But remember guys, you won’t magically lose weight just by drinking these and do nothing. You will still need to maintain an active lifestyle and eat a well balanced diet. All the best! xx
_________
MORE VIDEOS TO GUIDE YOU THROUGH YOUR JOURNEY
10 Food Hacks to Eat Less! (+Lose Weight)
–
How to Stop Overeating: 7 Types of Hunger
–
5 Must Eat Food for a Flat Tummy
–
Changes to Your Body from Age 20 – 70
–
My Weekly Food Shopping (Healthy Grocery Guide)
–
7 Must Have in Your Grocery List
–
How to STOP Binge Eating for Life
–
Healthy Ways to Deal with Period Cravings
–
How to Eat Cheat Meals & Still Lose Weight
–
How to Lose Weight & Stay Slim WITHOUT Dieting
https://youtu.be/8glBsla0R2A
–
Best Guide to Start a Successful Meal Plan & Lose Weight
https://youtu.be/o3X42uXHJ2g
–
How to Eat & Exercise Correctly According to Your Body Type
–
Here’s the complete playlist to more than 50 videos:
source
Womens Fitness
Joanna Soh 1st Live Stream – Let’s Chat =)

Hey my lovelies, it’s my first live stream on YouTube. I hope you enjoyed it! We spoke about fitness, nutrition, life, HER Network and more! Love chatting with all of you and I could just go on and on, haha! Do let me know if you want to have a LIVE CHAT every Thursday at these time:
6am PDT, 9am EDT (USA)
9pm Malaysia & Philippines
6.30pm India
2pm UK
12am Midnight Australia
HER Network is NOT sponsored. It’s an online network I created to bring together strong and passionate, women, driven by the same vision of wanting to support other women across to be their best self.
Her Network is an extension of my current YouTube channel: https://www.youtube.com/user/joannasohofficial SUBSCRIBE for exciting content every Monday, Wednesday and Friday. My video will be up every WEDNESDAY.
“We aim to offer you meaningful content that will continue to add value in your life. The videos will range from health & fitness, food, parenting, life advice, beauty, fashion, lifestyle and more.”
__________
Stay Connected & Follow us!
Joanna Soh:
http://joannasoh.com/
https://www.instagram.com/joannasohofficial/
https://www.facebook.com/joannasohofficial/
https://www.youtube.com/user/joannasohofficial
Tweets by Joanna_Soh
HER Network:
https://www.hernetwork.tv
https://www.facebook.com/hernetwork.tv
https://www.instagram.com/hernetwork.tv
source
Womens Fitness
Gentle Morning Yoga Stretches to Feel Energized | HER Network

♥ 20-Minute Gentle Morning Yoga Stretches with Nika Karan to power your day with. Snap & Share pictures of your progress. Tag us @JoannaSohOfficial @NikaKaran #JSohActive #HERNetwork
♥ HER Network is NOT sponsored. It is an online network by Joanna Soh comprised of strong, passionate and like-minded women, driven by the same vision of wanting to support other women across the world to be the best version of themselves from inside & out. LIKE, SHARE this video & SUBSCRIBE http://www.youtube.com/joannasohofficial Support us in reaching 1 million subscribers!!! xx
Filmed at Be Urban Wellness: http://beurbanwellness.com
Cute workout clothes from https://www.instagram.com/ohsosom/
Polish-bred and Malaysia-based Nika Karan, is a holistic health coach & yoga teacher. As a busy entrepreneur and mum of 2 boys, she’s on a mission to teach other mums how to get in the best shape of their lives while eating better, cooking faster and exercising smarter. You can find more info about Nika’s signature transformation programs at https://www.nikakaran.com
Her Network is an extension of Joanna’s current YouTube channel: https://www.youtube.com/user/joannasohofficial SUBSCRIBE for exciting content every Monday, Wednesday and Friday.
“We aim to offer you meaningful content that will continue to add value in your life. The videos will range from health & fitness, food, lifestyle, beauty, fashion, travel, life guide, parenting, and more.”
Stay connected and follow us:
https://www.instagram.com/hernetwork.tv/ https://www.facebook.com/hernetwork.tv/
This workout combines relaxing yoga sequence with high intensity exercises to help you burn fat more effectively, and at the same time, give you the “relaxation” you need.
Exercises Sequence:
– Shavasana
– Side Spinal Twist
– Seated Forward Bend
– Seated Side Twists
– Cat Cow Stretch
– Downward Dog
– Forward Bend + Shoulder Release
– Forward Bend Side Stretch
– Twisted Chair Pose
– Sun Salutations with Warrior 1, Warrior 2 & Warrior 3
– Wide Legs Forward Bend
– Crescent
– Seated Twists
– Child’s Pose
Total Workout Time: 20 minutes
Best Results: Do this sequence morning for a more energy, better digestion and to have a productive day ahead.
Here are more yoga videos by Nika Karan to guide you through your journey: https://www.youtube.com/playlist?list=PLyP8pbBMxcsgVTh7dj-60LjZlaQKPhwJK
Please LIKE, SHARE & SUBSCRIBE. Follow us!
HER Network:
https://www.hernetwork.tv
https://www.facebook.com/hernetwork.tv
https://www.instagram.com/hernetwork.tv
Nika Karan:
https://www.nikakaran.com
https://www.facebook.com/coachnikakaran/
https://www.instagram.com/nikakaran/
Joanna Soh
http://joannasoh.com/
https://www.instagram.com/joannasohofficial/
https://www.facebook.com/joannasohofficial/
https://www.youtube.com/user/joannasohofficial
Tweets by Joanna_Soh
source
-

 Womens Self Defense11 months ago
New Legislation Empowers Women to Defend Themselves
-

 Self Defense News1 year ago
She was convicted of killing her abusive boyfriend. Now a Maple Grove woman is home awaiting a new trial.
-

 Self Defense News1 year ago
Self-Defense for All: The new Gracie Jiu-Jitsu Pasadena is for everyone | Online Features
-

 Womens Self Defense1 year ago
Top 5 Self-Defense Techniques Every Woman Should Know
-

 Womens Self Defense7 months ago
Understanding State-by-State Variation in Self Defense Laws
-

 Womens Fitness1 year ago
Xtreme Bodyweight HIIT (Lots of Jumping!) | Joanna Soh (Fio Series)
-

 Womens Preparedness1 year ago
10 essential skills for surviving in the great outdoors
-

 Womens Preparedness1 year ago
Empower Yourself: A Guide to Female Survival Planning

